Sunday, April 15, 2012

DIY Coasters

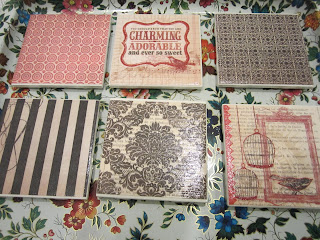
A few weeks ago I repinned this beautiful picture of coasters made out of tiles.

How easy does that sound!? I love their results (unfortunately the link was broken so all I had to go off of was the one paragraph of instructions). I tried it this weekend and it turned out better than I imagined!

Follow the jump for my instructions and more pictures!

More Crayon Art


I made another Crayon Art after my brother saw the first one I made, and asked me to make one for his birthday coming up! Since he's a guy I feel pretty confident he won't be looking at my blog anytime soon to ruin the surprise.

You can see pictures and instructions of my first piece here.

Sunday, April 8, 2012

Italian Easter Bread

Happy Easter Everyone!

I hope everyone is having a great Easter! I made the easiest Italian Easter Bread yesterday with a recipe I found on "The Italian Dish Blog".

This bread is so delicious! The only thing that went wrong for me was that for some reason after I twisted the dough and let it rise it didn't have that cool braided look. Here's my tip if that happens to you, use a knife to lightly cut the lines! I could sort of see the lines so I just lightly followed those with a knife cutting into the dough about a quarter inch into it. I think the end result was pretty good, not as beautiful as some of the more intricate braided easter breads, but they were cute breads that were a great size to bring to some neighbors (and eat straight out of the oven). I used regular sprinkles, and dyed the eggs using neon food coloring. I dyed the eggs raw since they would be hard boiled in the oven, and made dye with McCormick neon food coloring. For food color dye I just mixed 1/2 cup really hot water, 1 tsp vinegar, and 10 drops of food color. Just be SUPER careful with the raw eggs!

If you haven't made Italian Easter Bread before, or just want an easy recipe, try this one out!


Saturday, March 24, 2012

Easy Brie and Ham Sandwich

Today my Mom exclaimed we were having a Parisian lunch. She had brie, and mini french bread loaves. Normally, we would just stand over the counter and inhale the brie and bread, like we were eating our last meal on earth, but since we had black forest ham, whole grain mustard, and arugula in the fridge, they sounded like the perfect ingredients for a SANDWICH PARTY!!


I apologize for not having a better picture, but I devoured the first half before I realized I should share this!

This sandwich was so easy to make! Cut the baguette in half and set the broiler to high. On a cookie sheet I drizzled the insides of the bread with a little olive oil, then put slices of black forest ham on one side, and sliced pieces of brie on the other. Put the cookie sheet under the broiler, and keep the oven door open. Watch the bread, once the cheese melts and the bread looks toasted, pull the cookie sheet out. The cheese will melt quickly, and the bread will get nice and crunchy. Then, put some whole grain mustard, and arugula inside the sandwich. This delicious sandwich took me less than 10 minutes for prep and cooking!

I can't think of many things I like more than gooey melted cheese with crunchy bread, and the crisp peppery arugula complements the salty ham. If you haven't tried whole grain mustard yet, I highly recommend it! I think it's a little like dijon mustard, but with more of a subtle taste.

Hope you enjoy!!

Monday, March 19, 2012

Irish Car Bomb Cupcakes

About a month ago I started seeing pins for Irish Car Bomb Cupcakes...

First of all... Is any drink more exciting?! They are sweet, and STRONG! For those of you not in the know, an Irish Car Bomb is when you drop a shot glass with Baileys Irish Cream that has Jameson in it, into a Guinness. Make sure you chug fast because it will curdle, and it's NOT pretty when it does!

Anyway, after pinning 5 different recipes that were all slightly different I just decided to go for it... I used a bunch of different recipes, and just made my own. I got some tips for the ganache from my sister who owns Ciao Cupcake in San Diego, she was on Cupcake Wars and she's kind of a big deal.


Crayon Art

It seems like everyone has been re-pinning crayon art! I had to try it!

I got a nice canvas from Michaels and hot glued the pretty colors from a 64 color Crayola crayon box logo side up. 

Then it got fun! I put up a sheet since I heard this could get pretty messy! I'm glad I did! Don't use a good sheet, there will be some crayon splatters! I used the hottest setting on my hair dryer, and switched between high, medium, and sometimes low, you'll get a feeling for how you want it to look. I found sometimes if it was too high it just splattered it everywhere.

I'm not going to lie, it takes a while (it took me about an hour), but grab your iPod and just zone out on the pretty colors. I stuck to one color group rather than try to heat all of them up at once.


I went back and re-melted some of the colors that didn't show up very well or blended too much with the others.

I thought it looked cooler flipped around, it was so much fun and I love the end result! Next time I think I might melt it a little less.


There are so many different versions online! Some people don't keep the wrappers on, I thought it looked cool, although since I'm such a perfectionist it took a while to perfectly line them all up. 

Have you done it? How did you decide to make yours? Let me know in the comments!

Saturday, March 17, 2012

Pinteresting Adventures

Like everyone else I have become totally obsessed with Pinterest. I'll be sharing my crafts, recipes and other projects I found on pinterest! You can follow me on pinterest here!