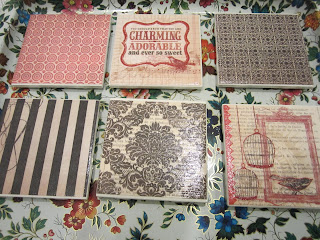
How easy does that sound!? I love their results (unfortunately the link was broken so all I had to go off of was the one paragraph of instructions). I tried it this weekend and it turned out better than I imagined!
Follow the jump for my instructions and more pictures!
What you need to make 6 coasters:
6 4x4 tiles
6 pages of scrapbook paper (or less if you want to use the same print)
Glossy Mod Podge
Paint brush or Foam Brush (I started with a paint brush but switched to the foam brush when I started finding little paint brush hairs on my coasters!)
Felt circles for the bottom of the coasters (if you don't want to get the self adhesive ones you'll need glue)
Clear Glossy Spray Paint
The first thing I did was get a book of scrapbook paper from Michaels. These are a gift for someone, and I wanted a certain theme, so a book of paper was perfect since it had a lot of the same colors. The book was $19.99 (thankfully Michaels almost always has 40% off deals, so I took advantage of that) and it has 48 pages so I'll be able to get a lot more uses out of it.
I got the 4x4 tiles at The Home Depot for 19 cents each. Working with one tile at a time, I painted a layer of glossy mod podge on the smooth part of the tile, and then put the scrapbook paper I had cut a little less than 4x4 inches to fit inside the tile. I had to work with the size of the paper a little bit, at first I cut it in a 4x4 square, but after I mod podged it the corners started lifting. I don't LOVE the look of white tile around the edges, but it will (hopefully) last longer this way. After I placed the paper down I took an old ID card (I'm sure there is a fancier tool for this) and scraped out air bubbles and excess mod podge. I used the excess to seal around the sides, and painted the top with more mod podge.
I did about 5 coats of mod podge, waiting 20-30 minutes between each coat. I made sure to always apply the mod podge in the same direction and I'm glad I did, I like the look of the brush strokes.
After a few hours when they were dry to touch, I applied the felt to the bottom. I got little felt self adhesive circles from The Home Depot. Those were $5, but they came in a bag of 160. I might have been able to do it cheaper by cutting my own felt, but I liked how these make the coasters raised (and I didn't have to hot glue myself to the coaster).
After applying the felt circles, I waited 24 hours and then gave them 2 coats of clear gloss spray paint, waiting 2 hours between each coat.
I am so excited with the way these turned out, and I cannot wait to give them as a gift! I won't tell you who they are for just in case they are reading but I'm hoping they will love them!
Here are more pictures, let me know if you have any questions, or how they turn out for you!


No comments:
Post a Comment